<meta name="google-site-verification" content="dC955zOHrNSQZ8zaElaYe5pdGSqnGhfNZ-p4ogURGZg" />

Introduction to AC Power Systems:
Generators, Transformers, Circuit Protection, and Wiring Essentials
In this course, we’ll delve into the basic fundamentals of how alternating current (AC) is generated, transmitted, and distributed by utility providers to power homes and businesses. We’ll explore the key components of AC power systems, including generators, transformers, and wiring essentials, as well as the critical safety mechanisms that ensure the protection of electrical systems—such as fuses, circuit breakers, and ground fault circuit interrupters (GFCIs). Whether you're new to the topic or seeking to expand your knowledge, this guide will equip you with practical understanding of how electrical power systems function.
While this course offers a basic overview of electrical concepts and components, it is important to note that this material is not intended to train professionals in the field. I strongly encourage you to refer to the National Electrical Code (NEC), which serves as the ultimate reference guide for safe electrical installations and wiring. The NEC is regularly updated to ensure safety and compliance with current standards, and its regulations should always take precedence over the information presented here. While the course material is related to practical applications, the discussion of AC generators, their components, and circuitry is intended for theoretical understanding only.
Important Reminder: You should never attempt to work on electrical systems, wiring, or circuits unless you are properly trained and certified. Only licensed professionals should perform electrical work, as improper installation can lead to hazards such as electrical fires, shock, and equipment damage.
Work Safely and Professionally
It's essential to understand the importance of professional training and certification when dealing with electrical work. Electrical systems can be hazardous if not installed or maintained correctly. Always ensure that any electrical work you perform, or have done, is in line with the NEC and carried out by trained professionals.
A Brief History of AC Generators
The development of alternating current (AC) generation was a transformative milestone in electrical engineering, revolutionizing how power is transmitted and utilized. While early generators relied on direct current (DC), AC systems ultimately proved superior for large-scale electricity distribution.
Early Foundations: The Road to AC Power
Notable inventors such as Michael Faraday and Hippolyte Pixii laid the groundwork for electrical generation. Faraday’s discovery of electromagnetic induction in 1831 was the foundation of all electrical generators. Pixii’s early dynamo in the 1830s demonstrated the possibility of converting mechanical motion into electrical energy.
However, these early generators primarily produced direct current, which faced severe limitations in transmitting electricity over long distances due to energy loss.
Nikola Tesla’s Vision and Innovations

Nikola Tesla, a Serbian American inventor, revolutionized the field of electrical power generation with his pioneering work in AC systems. In the late 19th century, Tesla developed the AC induction motor and multi-phase alternating current systems, providing efficient, scalable power transmission, a breakthrough that directly challenged Thomas Edison’s DC power model.
Some of Tesla’s most significant contributions to AC power generation include:
-
Polyphase AC System (1888): Tesla’s patents outlined an AC system using multiple phases, which dramatically improved efficiency and reliability.
-
Tesla’s AC Induction Motor: A self-starting motor using rotating magnetic fields, crucial for industrial machinery.
-
Transformers for Voltage Regulation: Enabled efficient transmission of electricity over vast distances.
-
The Niagara Falls Power Plant (1895): Tesla’s AC system was used to harness hydropower at Niagara Falls, proving AC’s superiority in real-world applications.
The War of Currents: AC vs. DC
Tesla’s AC system, backed by industrialist George Westinghouse, went head-to-head with Thomas Edison’s DC model in what became known as the War of Currents. AC’s ability to travel long distances with minimal loss ultimately led to its widespread adoption, securing Tesla’s legacy as a foundational figure in modern electrical generation.
Nikol Tesla’s Lasting Legacy
Today, virtually all large-scale electrical power generation relies on Tesla’s AC system. His polyphase generators, transformers, and induction motors remain essential components in global energy infrastructure.
Tesla’s contributions not only shaped modern power generation but also laid the foundation for innovations such as wireless electricity and renewable energy systems. His visionary approach continues to inspire engineers and scientists working on the future of electrical energy.
Roles of Electrical Professionals In Industry
In the electrical industry, there is a clear structure of professionals who design, install, and maintain electrical systems. Each role is essential to ensuring systems are efficient, safe, and reliable. Here’s an overview of key positions within the field, along with educational requirements, job opportunities, and potential salaries:
Electrical Engineers
-
Role: Electrical engineers are responsible for designing and developing electrical systems, which include power generation, transmission, distribution, and specialized systems such as AC generators and transformers.
-
Responsibilities: Electrical engineers create technical blueprints, design specifications, and power distribution plans. They also ensure that electrical systems are energy-efficient, reliable, and compliant with safety and regulatory standards.
-
Educational Requirements: A Bachelor’s degree in Electrical Engineering or a related field is typically required. Advanced positions may require a Master’s degree or relevant certifications in specialized areas like power systems or renewable energy.
-
Job Opportunities: Electrical engineers can work in various industries, including utilities, and renewable energy sectors. There is a growing demand for engineers in emerging technologies, like smart grids.
-
Salary: The median annual salary for electrical engineers in the U.S. is approximately $105,000, with variations depending on experience, education, and location. Engineers in specialized fields such as power systems can earn higher salaries, reaching $120,000+.
Licensed Electricians
-
Role: Electricians are responsible for installing, maintaining, troubleshooting, and repairing electrical systems. They handle a variety of components, including wiring, outlets, circuit breakers, panels, and modern systems like solar power.
-
Responsibilities: Electricians read and understand electrical diagrams, follow local building codes, and ensure installations are safe, functional, and up to code. They are often the frontline workers in constructing electrical infrastructure and responding to emergency repairs.
-
Educational Requirements: Becoming a licensed electrician typically requires completing an apprenticeship program (usually lasting 4-5 years), which combines classroom instruction and hands-on training. Most states also require electricians to pass an exam to obtain licensure.
-
Job Opportunities: Electricians are in high demand in residential, commercial, and industrial settings. They also have opportunities in specialized areas, such as renewable energy systems or electrical systems for smart homes.
-
Salary: The median salary for electricians is around $56,000 per year, but experienced electricians, particularly those with specialized skills in high-demand areas, can earn upwards of $80,000 annually. In some locations, electricians working for electric utility companies or in unionized positions can earn even more.
Electrical Inspectors
-
Role: Electrical inspectors are responsible for ensuring that electrical installations meet national and local standards, particularly the National Electrical Code (NEC). They perform inspections to confirm compliance with safety codes and regulations.
-
Responsibilities: Inspectors review installation plans, conduct on-site inspections, and issue permits. They ensure that electrical systems are installed safely and that they meet all legal requirements.
-
Educational Requirements: Electrical inspectors typically have an Associate’s degree in electrical technology or a related field. They often need to have experience as an electrician, and may need to obtain specific certification or licensure, depending on the state.
-
Job Opportunities: Electrical inspectors are employed by local governments, private inspection agencies, or utility companies. As construction and electrical code regulations become more stringent, the need for qualified inspectors continues to grow.
-
Salary: The median salary for electrical inspectors is around $60,000 annually, with opportunities to earn more in areas with high demand or complex inspection requirements, especially in industrial settings.
Electrical Workers for Electric Utility Companies
-
Role: Electrical workers employed by electric utility companies play a crucial role in maintaining and repairing the infrastructure that delivers electricity to homes and businesses. This includes working with power lines, transformers, and substations.
-
Responsibilities: These workers install, maintain, and repair high-voltage transmission lines, as well as step-up and step-down transformers in substations. They often work outdoors, sometimes in hazardous conditions, to ensure that the grid remains operational and safe. These professionals are also crucial during emergency situations such as power outages, storms, and natural disasters.
-
Educational Requirements: Most workers in this field start as apprentices and complete a formal training program or apprenticeship that lasts several years. They may also need to complete safety training and obtain certifications in handling high-voltage equipment. A high school diploma or GED is usually the minimum requirement, though some positions may require additional technical schooling or certifications.
-
Job Opportunities: Utility companies, including electric power transmission and distribution companies, often have a steady demand for qualified workers. This sector is also expected to grow as the demand for electricity increases and infrastructure needs to be upgraded or maintained.
-
Salary: Electrical workers in utility companies typically earn between $50,000 and $80,000 annually, with some highly experienced workers earning more, especially if they work in specialized or supervisory roles.
BASIC ELECTRICAL GRID
Electrical Energy Generation, Transmission, Distribution
Illustration #1

THE ELECTRIC GRID
Power Generation and Distribution
(Refer to Illustration # 1)
Each country has its own specific operational voltages and frequency standards for their electrical grid, which vary based on regional infrastructure, safety standards, and historical practices. For the purpose of this guide, we will focus specifically on the United States and its power generation and distribution systems.
In the U.S., the electrical grid operates on a frequency of 60 Hertz (Hz), meaning the alternating current (AC) reverses direction 60 times per second. This differs from some other countries, like those in Europe, which typically use 50 Hz. The difference in frequency influences how electrical equipment is designed, as devices are often built to work at either 50 Hz or 60 Hz.
As for voltage, the U.S. grid typically provides:
-
120 volts for standard household use, powering common appliances and lighting in residential settings.
-
240 volts for larger appliances, such as air conditioners, dryers, and ovens, in residential settings.
-
208 volts in commercial and some industrial settings, especially when derived from a three-phase Wye configuration.
-
480 volts in industrial settings for high-power equipment and machinery.
Electric Grid Primary Components:
1. Power Generation
-
The process of electricity generation begins with power plants, where AC generators (alternators) convert mechanical energy into electrical energy.
-
AC Generators: The most common generators used in power plants are alternating current (AC) generators, which rotate a magnetic field within a set of stator windings to produce electricity. As mentioned, the frequency of AC generation in the U.S. is 60 Hz, meaning the current reverses direction 60 times per second.
2. Step-Up Transformers
-
Step-Up Transformers are used at power plants to increase the voltage of the generated electricity before it is sent over long distances.
-
The reason for stepping up the voltage is to reduce energy loss during transmission. The higher the voltage, the lower the current for the same power output (since power is the product of voltage and current: P = V × I which reduces the resistive losses in transmission lines.
-
In the U.S., power plants typically step up the voltage to several hundred thousand volts (e.g., 138 kV, 230 kV, or even up to 765 kV) for long-distance transmission.
3. Transmission Lines
-
High-Voltage Transmission Lines carry the stepped-up voltage electricity from power plants across vast distances to substations near populated areas.
-
These lines are typically overhead and use high-voltage to ensure that the power can travel long distances with minimal losses. The high voltage allows for efficient transmission with lower current and, consequently, lower energy loss due to resistance in the wires.
4. Step-Down Transformers
-
Once the high-voltage electricity reaches a substation, step-down transformers are used to lower the voltage to levels that are safe and usable for consumers.
-
These transformers reduce the voltage from several hundred thousand volts (e.g., 230 kV) to more manageable levels, such as 12 kV, 33 kV, or 69 kV, depending on the distribution system.
-
The purpose is to make the electricity safe for local distribution and to further reduce transmission losses in urban or suburban areas.
5. Local Transformers and Distribution
-
After stepping down the voltage at a substation, local transformers are used to further reduce the voltage for residential and commercial use.
-
Residential Distribution: For homes, the voltage is typically reduced to 120V for standard household appliances and lighting, or 240V for heavy-duty appliances like ovens, dryers, and air conditioners. This split-phase system delivers two 120V lines 180 degrees out of phase, providing 120V and 240V in residential areas.
-
Commercial and Industrial Distribution: In commercial and industrial areas, the voltages might be 208V (in a three-phase Wye configuration) or 480V for high-power equipment and machinery.
-
-
The final step is distributing the power through distribution lines to consumers. These lines may be either overhead or underground, depending on local infrastructure and regulations.
-
Distribution Transformers: These are located in neighborhoods and transform the voltage to 120V/240V or other appropriate levels, allowing individual homes, businesses, and industries to use the electricity safely.
AC GENERATORS /ALTERNATORS

Single Phase AC Generator with Stationary Stator Coil
& Rotating Electromagnetic Rotor Coil.

Illustration #2
PazogaEngineering.com
Basic Operating Principles of an AC Generator
1. Magnetic Field:
As per illustration #2, this type of generator consists of a rotating electromagnet, and a coil of wire that is part of the stator (the stationary part of the generator).
2. Motion:
As per illustration #2, when the generator is in operation, the rotor rotates inside the stator. The rotational motion of the electromagnetic rotor causes the magnetic flux through the coil to change over time. This is the key principle of electromagnetic induction.
3. Electromagnetic Induction:
According to Faraday's Law of Electromagnetic Induction, when a conductor (like the wire coil) moves through a magnetic field, it experiences a change in magnetic flux, which induces a voltage (or electromotive force, EMF) in the conductor. This means that as the magnetic field around the coil changes, it causes electrons in the coil to move, creating an electric current.
Components of a Single-Phase AC Generator
with an Electromagnet Rotor:
(Refer to Illustration #2)
Rotor with Electromagnet Coil:
In this type of generator, the rotor (the rotating part) consists of a coil of wire (an electromagnet), which requires a DC current to create a magnetic field.
The rotor's coil is energized by a DC power supply. This is provided through brushes and slip rings that make continuous contact with the rotating coil.
Slip Rings and Brushes (for Electromagnet Rotor Generators):
In this type of generator, the electromagnet rotor is powered by DC supplied through slip rings. These slip rings maintain an electrical connection between the rotor and the external DC power source. Brushes make contact with the slip rings, allowing current to flow and energize the rotor's electromagnet, which is essential for creating the magnetic field.
DC Power for the Electromagnet:
The DC power source supplies current to the rotor coil, which generates a magnetic field around the rotor. This field is maintained constantly while the rotor spins. The DC excitation is crucial because it allows the rotor to act as an electromagnet, producing a controlled magnetic field that will induce an AC voltage in the stator as the rotor spins.
Inducing AC Voltage in the Stator:
As the rotor (with its electromagnet) spins inside the stator (which is stationary and consists of a coil or windings), the rotating magnetic field passes through the stator, inducing an alternating current (AC) in the stator windings.
The induced voltage alternates because the direction of the magnetic field changes as the rotor turns, creating a sinusoidal AC waveform in the stator.
External Circuit:
The alternating current (AC) generated by the interaction between the spinning electromagnet rotor and the stator is then available to be used in an external circuit. This AC voltage can power electrical devices or be sent to the electrical grid.
How Rotor Speed, Magnetic Field, and Stator Design
Determine AC Generator Voltage
The amount of voltage generated in an AC generator is primarily determined by the following factors:
1. Speed of the Rotor (Rotational Speed):
-
Faster Rotation = Higher Voltage: The voltage generated in an AC generator is proportional to the speed at which the rotor (the rotating part of the generator) turns. The faster the rotor spins, the more frequently the magnetic field lines cut through the stator windings, inducing a higher voltage.
This is governed by the equation:
E = N × B × A × ω
Where:
-
E is the induced voltage,
-
N is the number of turns in the coil,
-
B is the magnetic field strength,
-
A is the area of the coil,
-
ω is the angular speed of the rotor.
2. Strength of the Magnetic Field (Magnetic Flux):
-
Stronger Magnetic Field = Higher Voltage: The amount of voltage generated is also directly proportional to the strength of the magnetic field in the generator. A stronger magnetic field (whether from permanent magnets or electromagnets) will induce a higher voltage in the stator windings.
-
The magnetic field is often produced by magnets or electromagnets, and increasing the current to the electromagnets can boost the strength of the magnetic field.
3. Number of Turns in the Stator Windings (Coil Turns):
-
More Turns = Higher Voltage: The number of turns (or coils) of wire in the stator windings is another key factor. More turns in the coil will induce a higher voltage because each additional coil adds more "paths" for the magnetic field to induce current.
-
The voltage is proportional to the number of turns in the coil. More turns of wire create more electromotive force (EMF) in response to the changing magnetic field.
4. Area of the Stator Windings:
-
Larger Coil Area = Higher Voltage: The larger the area of the stator coil (the area through which the magnetic flux lines pass), the higher the voltage that can be induced. A greater coil area allows for more interaction with the magnetic field, which results in a larger induced voltage.
5. Type of AC Generator (Single-Phase, Two-Phase, etc.):
-
Different types of AC generators may have different output characteristics based on the configuration of their windings and the number of phases. For example, a multi-phase generator (e.g., three-phase) can provide higher overall power output compared to a single-phase generator at the same voltage.
Poles in an AC Generator
The Relationship Between Rotor Poles and AC Frequency Explained
In an AC generator, poles refer to the magnetic poles created by the rotor (the rotating part of the machine). These poles are either permanent magnets or electromagnets that alternate between North and South as the rotor spins. The number of poles in the generator plays a critical role in determining the frequency of the alternating current (AC) produced, as well as influencing the physical design and operation of the generator.
What Are Poles?
In an AC generator, poles are the magnetic North and South points on the rotor. The rotor typically will have multiple poles arranged in pairs.
For example, the Single-Phase AC Generator in illustration # 2, is a generator with a 2-pole rotor which has one North pole and one South pole on the rotor. A 4-pole rotor, on the other hand, will have two North poles and two South poles.
As the rotor spins, these poles generate a changing magnetic field that interacts with the stator (the stationary part of the generator) to induce an alternating current. The number of poles determines how frequently the magnetic field changes, which directly affects the frequency of the AC produced.
Role of Poles in the Generator’s Frequency:
The number of poles in an AC generator directly impacts the frequency of the AC it generates. The relationship between the rotational speed of the rotor and the frequency of the AC can be described by the following formula:
f = P × N / 120
Where:
-
f is the frequency of the AC (in Hz),
-
P is the number of poles in the generator,
-
N is the speed of the rotor in RPM (revolutions per minute),
-
120 is a constant that converts rotational speed to electrical cycles.
Two examples: a 2-pole rotor, and a 4-pole rotor:
Example #1
2-Pole Rotor to Produce 60 Hz
If, you want a generator that produces a 60 Hz frequency, we can determine the rotor speed needed for a 2-pole rotor by using our formula:
f = P × N / 120
We can solve for (N) by performing an algebraic rearrangement of the equation, isolating the variable (N) on one side of the equation, where:
f = P x N/ 120
REARRANGED TO BE:
N = f x 120 / P
Where for a frequency of 60 Hz and a 2-pole rotor (P = 2), we can solve for N (rotor RPM):
N (rotor RPM) = 60 (hertz) × 120 (electrical constant) / 2 poles = 3600 RPM
So, a 2-pole rotor needs to rotate at 3600 RPM to produce 60 Hz AC.
Example #2
4-Pole Rotor to Produce 60 Hz
Using the same formula:
f = P × N / 120
For 60 Hz and a 4-pole rotor (P = 4), we solve for N:
60 = 4 × N / 120
Solving for N:
N = 60 × 120 / 4 = 1800 RPM
So, a 4-pole rotor only needs to rotate at 1800 RPM to produce 60 Hz AC.
Why Do More Poles Lower the Speed?
As you can see from the examples, a 4-pole rotor needs to rotate at half the speed of a 2-pole rotor to produce the same frequency of 60 Hz. The reason for this is that a rotor with more poles completes one full cycle of the AC wave (North-South to North-South) in fewer rotations, thus requiring fewer RPMs to achieve the same frequency.
In simpler terms:
-
2-pole rotor: Spins faster (3600 RPM) to produce a given frequency (60 Hz).
-
4-pole rotor: Spins slower (1800 RPM) to produce the same frequency (60 Hz).
Generator Configuration:
The configuration of the AC generator (whether it's synchronous or induction) affects how the rotor interacts with the stator to generate alternating current:
-
Synchronous Generator: The rotor spins at the exact same speed as the rotating magnetic field generated by the stator. This means the rotor and stator are synchronized, which is ideal for stable and predictable AC frequencies.
-
Induction Generator: In this configuration, the rotor does not necessarily spin at the same speed as the stator's magnetic field. The rotor is induced to generate electricity by the changing magnetic field, often used in situations where the rotor speed is not constant.
Common AC Generator Specifications
AC Generator Specifications:
Voltage:
-
Generators are rated in RMS voltage. The RMS value is the most useful measure for practical power distribution because it directly correlates to the power that can be used by electrical devices.
-
Peak voltage (which is about 1.414 times the RMS voltage for a sine wave) is typically not used to specify the generator's output for standard residential power systems, since the devices you connect to the generator are designed to operate on the RMS voltage.
Frequency:
-
In the U.S., most generators are designed to operate at a frequency of 60 Hz. This determines the speed at which the generator's rotor must turn in order to produce the correct 60 hertz AC waveform.
Power Output:
-
The generator's power output will be specified in watts (W) or kilowatts (kW). This is the amount of electrical power it can supply at the rated voltage. For example, a 120V, 5 kW generator would provide 5,000 watts of power at 120V.
Current:
-
The generator will also have a current rating, typically expressed in amperes (amps). For a 120V generator with a 1 kW output, the current would be calculated as follows:
I = P / V = 1000W / 120V ≈ 8.33A
Fundamentals of Sine Waves and AC Power
Single Phase AC Generator Output Sine-Wave
120Vac - 60 Hertz (Hz)
(Voltage - Time Graph)
RMS Voltage = 120V AC
(Root Mean Square value, represents the effective voltage)
Peak Voltage = ±169.7V
(The maximum voltage value in either direction)
Peak-to-Peak Voltage = ±339.4V
(The full voltage swing from positive to negative)
Illustration #3

Frequency Relates to a Generator Sine-Wave
Sine Wave:
As per illustration #3, a sine wave is a smooth, periodic oscillation that alternates between a positive and a negative value. It represents the voltage or current output from a generator.
Cycle:
One complete cycle of a sine wave refers to the wave moving from 0V, reaching a positive peak, returning to 0V, reaching a negative peak, and then returning to 0V again. This process forms one complete oscillation.
Frequency:
The frequency of the sine wave is the number of times it completes this cycle in one second.
Sine-Wave Calculations
PEAK TO PEAK VOLTAGE:
Peak-to-peak voltage abbreviated as Vpp is a measurement of the total voltage range of an AC waveform, from the highest positive value (the peak) to the lowest negative value (the trough. It represents the full amplitude of the waveform, capturing the distance between the highest and lowest points of the signal.
Vpp = 2 x Vp
Peak Voltage
Peak voltage often denoted as Vpeak is the maximum positive or negative voltage reached by an alternating current (AC) waveform, either in the positive or negative direction, during a complete cycle.

RMS Voltage
RMS Voltage (Root Mean Square Voltage) is a statistical measure used to describe the effective value of an alternating current (AC) for sinusoidal waveforms or voltage waveform. It represents the equivalent DC voltage that would produce the same amount of heat or power in a resistive load as the AC voltage does. In simple terms, RMS voltage gives you a measure of the "power" capability of an AC signal, just as an equivalent DC voltage would.
For a sinusoidal AC waveform, the RMS voltage is calculated using the following formula:
Where:
Vpeak is the peak voltage of the sine wave
(the maximum value the voltage reaches).
For a pure sine wave, the RMS voltage is about ≈ 0.707 times the peak voltage.

Single Phase AC Generator with Permanent Magnet Rotor
Illustration #4

Single-Phase AC Generator with Permanent Magnet Rotor
(Refer to Illustration #4)
This type of generator, also known as a permanent magnet alternator (PMA), is a simple design that generates alternating current (AC) using permanent magnets instead of electromagnets for the rotor.
How It Functions:
Permanent Magnet Rotor:
-
The rotor (the rotating part) consists of permanent magnets arranged in a way that their magnetic field is constantly present without needing an external power supply to generate the field. These permanent magnets rotate as the rotor turns.
-
As the rotor spins, it creates a rotating magnetic field.
Stationary Stator:
-
The stator is the stationary part of the generator, consisting of a coil of wire. The stator does not move; instead, it is the conductor where the induced current is generated.
-
When the rotor (with its permanent magnets) rotates, the magnetic flux through the stator coil changes over time. This variation in magnetic flux causes an electromotive force (EMF) to be induced in the stator coil, which results in an alternating current (AC) output.
AC Output:
-
The output of this generator will be an AC sine wave, with the voltage alternating between positive and negative cycles. The frequency of the AC output depends on the speed of the rotor rotating, revolutions per minute (RPM).
Features of This Type of Generator:
-
Permanent Magnet Rotor: The use of permanent magnets eliminates the need for an external power source to generate the magnetic field, making the design simpler and more efficient.
-
Stationary Stator: The stator stays in place while the rotor spins, allowing for easier and more compact construction.
-
No External Field Excitation Required: Since the rotor uses permanent magnets, there's no need for brushes, slip rings, or an external DC supply to energize the field (as would be needed in a separate-excitation generator with an electromagnet rotor).
Applications of Permanent Magnet Alternators (PMAs):
-
Small-Scale Power Generation:
-
PMAs are often used in small-scale applications, such as in wind turbines or hydroelectric systems, where simplicity and low maintenance are crucial.
-
-
Backup Power Generators:
-
These types of generators are ideal for backup power applications in homes or off-grid systems because of their compact size and low operational complexity.
-
-
Portable Generators:
-
Many portable generators, including those used for camping or outdoor activities, use permanent magnet alternators due to their reliability and ease of maintenance.
-
Advantages of Permanent Magnet Single-Phase Generators:
-
Simplicity:
-
The design is straightforward, with fewer moving parts. This simplicity makes the generator easier to manufacture, maintain, and repair.
-
-
Reliability:
-
Without the need for brushes or slip rings (which are commonly found in generators with electromagnets), there are fewer wear parts, leading to higher reliability and less maintenance.
-
-
Efficiency:
-
These generators tend to be more efficient than their electromagnet-based counterparts, especially in small-scale applications. The absence of an external power source for the magnetic field reduces energy losses.
-
-
Compact and Lightweight:
-
Because of the use of permanent magnets, these generators are usually smaller and lighter than other types of generators. This makes them ideal for applications where space and weight are important factors (such as in portable generators or electric vehicles).
-
-
No Need for External Excitation:
-
The absence of a need for an external DC supply to energize the rotor's magnetic field simplifies the generator's operation and increases its durability.
-
Disadvantages of Permanent Magnet AC Generators:
-
Fixed Voltage Output:
-
The voltage output of a permanent magnet generator is typically fixed and depends on the rotor speed. It can be harder to regulate, especially under varying load conditions.
-
Some systems use voltage regulation techniques like voltage regulators or bucking circuits to manage this, but it can still be more challenging compared to generators with electromagnet rotors.
-
-
Limited Power Output:
-
While permanent magnet generators are highly efficient, their power output is generally limited compared to larger, electromagnet-based generators. They are best suited for low to moderate power needs.
-
Split-Phase AC Generator
Illustration #5


Understanding Split-Phase Generator Operation
(Refer to Illustration #5)
In a split-phase system (commonly used in residential power systems, especially in the U.S.), there are two coils that are 180 degrees apart. This setup generates 120V for each phase, and the 240V is obtained when those two 120V phases are combined.
Split-Phase Generator Configuration:
-
Two Coils: There are two separate coils on the stator of the generator, and these coils are placed 180 degrees out of phase with each other. This means that the voltage generated in one coil is opposite in polarity to the voltage generated in the other coil at any given moment.
-
Neutral Point: The generator has a neutral point in the middle of the two coils. This neutral point is created by connecting the two coils together at a central tap (center point).
-
120V on Each Coil: Each coil generates 120V (in the U.S. system), but because they are 180 degrees out of phase, the voltages are opposite in polarity.
-
240V Between the Two Coils: When you measure between the two hot wires (the two coils), you get 240V because the two phases are out of phase by 180 degrees, causing their voltages to add up.
How the Generator Works:
-
Coil A produces 120V.
-
Coil B produces 120V, but it is 180 degrees out of phase with Coil A.
-
The neutral wire is the common point between the two coils.
-
120V is available from either coil to neutral.
-
240V is available across the two hot wires (the two coils).
Main Features of the Split-Phase Generator Configuration:
-
Two coils that are 180 degrees apart.
-
120V is provided between each hot wire (coil) and the neutral wire.
-
240V is provided between the two hot wires (the two coils).
-
This configuration enables typical residential homes to use both 120V (for lights, outlets, etc.) and 240V (for larger appliances like dryers and stoves) from the same power supply.
Split-Phase System (Typical Residential 240V):
-
Two coils (windings) are used, and they are 180 degrees out of phase with each other.
-
Each coil generates 120V with respect to neutral.
-
One coil will produce +120V relative to neutral.
-
The other coil will produce -120V relative to neutral.
Line-to-Line Voltage:
To get 240V, you measure between the two coils (the two "hot" lines).
Since one coil is producing +120V and the other is producing -120V, the line-to-line voltage is the difference between the two:
120V − (−120V) = 240V
Split-Phase Configuration Voltages:
-
Phase-to-neutral voltage: 120V
-
Line-to-line voltage: 240V (because the two phases are 180° out of phase)
Formula for Split-Phase:
The formula for calculating line-to-line voltage (240V) in a split-phase system:
VLL = 2 × VPH
Where:
-
VLL = Line-to-line voltage (240V)
-
VPH = Phase-to-neutral voltage (120V)
This setup is typical for residential wiring in the U.S., and it's often referred to as 120/240V split-phase.
Applications of Split-Phase Systems:
-
Residential Power Distribution:
-
This system is most commonly found in residential electrical systems in the United States and Canada.
-
It supplies both 120V for standard appliances (lights, outlets, etc.) and 240V for high-power appliances (such as clothes dryers, electric stoves, and air conditioning units).
-
-
Power Generation in Smaller Systems:
-
Small generators or backup systems often use a split-phase setup for residential applications, providing an efficient and convenient solution for both standard and high-power equipment.
-
Advantages of Split-Phase Systems:
-
Efficient Use of Two Phases:
-
It enables homes to efficiently use both 120V and 240V from the same system, maximizing the power output for a variety of appliances.
-
-
Cost-Effective:
-
Less complex than three-phase systems, which makes it more cost-effective and easier to install in residential settings.
-
-
Balanced Load:
-
The system provides a balanced load, meaning that power usage is distributed evenly between the two 120V phases, which can help reduce the risk of overloading a single phase.
-
-
Availability of Both Voltages:
-
It conveniently provides 240V for high-demand appliances while supplying 120V for general household usage, without the need for separate circuits or installations.
-
Disadvantages of Split-Phase Systems:
-
Limited Power Capacity:
-
Compared to three-phase systems, the split-phase system has lower power capacity and is not ideal for large industrial or commercial applications.
-
It cannot supply the higher levels of power that three-phase systems can provide, limiting its use to residential or light commercial applications.
-
-
Less Efficiency for Large Loads:
-
For large motors or heavy machinery, split-phase systems can be less efficient compared to three-phase power, especially for industrial uses.
-
-
More Wiring for Certain Applications:
-
For appliances that require 240V, split-phase systems need separate wiring for both hot wires and a neutral. This can increase the complexity of wiring for large installations or systems.
-
-
Limited Phase Balance:
-
If the two phases are not balanced properly (due to faulty wiring or improper load distribution), it can result in voltage imbalance, which can lead to equipment malfunction or damage.
-
THREE-PHASE AC GENERATOR - 3 WIRE - DELTA CONFIGURATION
Illustration #6


Delta-Delta Generator and Transformer:
(Illustration #6)
The Delta Symbol:
The Delta symbol (Δ) is a triangle, and it is used to represent a Delta connection in electrical systems. The symbol itself looks like an equilateral triangle and is commonly used to show the configuration of three-phase circuits.
When you see the Δ symbol in diagrams or technical documentation, it typically indicates the Delta configuration of the windings or phases.
Delta Generator:
In a Delta generator, there are three coils (or windings) arranged in a Delta configuration. The ends of the three coils are connected in a triangle shape, with no neutral point. The generator produces three-phase power, with each phase separated by 120 degrees of electrical rotation. The line-to-line voltage (between any two phases) is the primary output, as there is no neutral voltage available.
Delta Transformer:
Similarly, a Delta-configured transformer has its primary windings connected in a Delta configuration, meaning three coils are connected in a triangle with no neutral point on the primary side. Importantly, most transformers are designed such that the primary and secondary side can be wired either in Delta or Wye configuration, depending on the application and the required voltage output.
Operation of Delta-Delta System:
-
Delta Generator:
-
The generator produces three-phase power with phases 120 degrees apart.
-
No neutral wire is required for the output. All voltages in the system are phase-to-phase (line-to-line voltage).
-
The voltage between any two phases is delivered to the load (no neutral voltage).
-
-
Delta Transformer:
-
The Delta transformer takes the three-phase power from the generator and distributes it through the Delta-wound primary. If the secondary side is also Delta-connected as shown in illustration #6, the voltage on the secondary side will be the same as on the primary side, and the line voltage will be equal to the phase voltage.
-
Alternatively, if the secondary side is Wye-connected, the transformer can provide both line-to-neutral and line-to-line voltages.
-
Grounding in Delta-Delta Systems:
Earth Grounding:
Grounding in a Delta-Delta system can be more complex since there is no neutral point on the primary side. Grounding typically occurs on the secondary side of the transformer if it is Wye-connected. However, if both the primary and secondary sides of the transformer are Delta-connected as shown, grounding is usually applied to the transformer frame.
In Delta-Delta systems, grounding of the secondary side depends on the configuration:
-
If the secondary is Wye-connected, the neutral may be grounded.
-
If the secondary is Delta-connected, as shown, then the grounding is applied to the transformer frame or other conductive parts, as there is no neutral.
Safety Role of Grounding:
-
The earth ground provides a safe path for fault currents, helping to prevent electrical shock hazards and damage to equipment.
-
In a Delta system, grounding helps ensure that in the event of a fault (e.g., short circuit), current will flow to the ground rather than passing through a person or causing equipment failure.
Features of Delta-Delta System with Earth Ground:
-
The Delta generator produces three-phase power with line-to-line voltages and no neutral.
-
The Delta transformer maintains the same Delta configuration on the primary side.
-
Grounding occurs either through the secondary neutral (if Wye-connected) or the transformer frame as shown (if both sides are Delta-connected).
-
Earth grounding is essential for safety, providing a path for fault currents and ensuring electrical safety.
Practical Use of Delta-Delta System:
Delta-Delta configurations are commonly used in industrial settings where high-power equipment requires three-phase power without a neutral. This configuration is especially useful for:
-
Large motors, which often operate on three-phase power.
-
High-power transformers, where the absence of a neutral is not an issue.
-
Loads that do not require a neutral wire, such as large electrical machines or equipment that only needs phase-to-phase voltages.
Advantages of Delta-Delta Systems:
-
Efficient Power Distribution:
-
Delta-Delta systems are highly efficient for high-power applications. They are often used in environments where consistent, three-phase power is needed, such as in industrial motors or large machines.
-
-
No Neutral Required:
-
In a Delta configuration, there is no neutral required, which simplifies wiring and reduces the number of conductors needed for power distribution.
-
-
Reliability:
-
Delta systems are less prone to voltage imbalances because they have no neutral, and the system can continue operating even if one phase is lost (though with reduced performance).
-
-
Reduced Transformer Size:
-
Delta systems typically require smaller transformers compared to Wye-based systems for equivalent power levels, making them more cost-effective in certain industrial applications.
-
Disadvantages of Delta-Delta Systems:
-
No Neutral for Single-Phase Loads:
-
Since there is no neutral point, single-phase loads that require a neutral cannot be easily connected to the system unless a Wye secondary side is used.
-
-
Grounding Complexity:
-
Grounding in Delta-Delta systems can be more complex. Without a neutral, grounding is typically done through the transformer frame or equipment, which may require additional safety measures.
-
-
Fault Detection Challenges:
-
Delta systems can be more challenging when it comes to detecting faults. If a fault occurs on one phase, the system may continue to operate but at reduced capacity, which could lead to unrecognized issues.
-
-
Potential for Unbalanced Loads:
-
Although the Delta configuration provides three-phase power, unbalanced loads (unequal current draw on the phases) can still cause inefficiencies and potentially damage equipment over time.
-
THREE-PHASE AC GENERATOR WYE (STAR) CONFIGURATION
Illustration #7A

Illustration # 7B

Illustration 7C
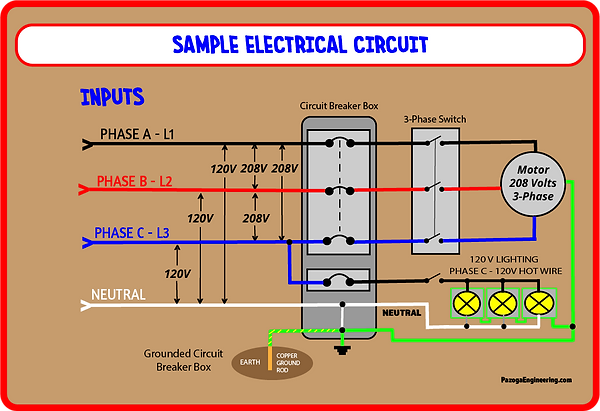
Illustration # 7D

Refer to Illustrations #7A, 7B, 7C, 7D
Wye Generator and Transformer Configuration:
A Wye (Star) Generator configuration is commonly used in three-phase electrical systems. In a Wye configuration, the three windings (or coils) of the generator are connected in such a way that they meet at a central neutral point. This neutral point is often grounded for safety, helping stabilize the system and providing a path for fault currents.
How the Wye Generator Works:
In a Wye generator, three windings are arranged in a star-shaped configuration. Each winding generates one of the three phases of the system, with the phases separated by 120 degrees of electrical rotation. The neutral point is the common point where the three windings meet. This neutral point can be grounded for system safety, providing protection against electric shocks and stabilizing the voltage levels.
-
Phase-to-Neutral Voltage: This is the voltage measured between one of the three phase conductors and the neutral point.
-
Line-to-Line Voltage: This is the voltage measured between any two of the three-phase conductors.
RMS Voltage Calculation:
The RMS (Root Mean Square) value is used to represent the effective value of the alternating current (AC) voltage. For sinusoidal waveforms, the RMS voltage can be calculated from the peak voltage using the formula:
VRMS = 0.707 × Vpeak
Where:
-
VRMS is the RMS voltage (the effective voltage value),
-
Vpeak is the peak voltage (the maximum voltage during a cycle).
For example, if the peak voltage of the generator is 339.4V, then the RMS voltage would be:
VRMS = 0.707 × 339.4V ≈ 240V
This RMS value is used to compare the voltage in a way that represents the equivalent value of direct current (DC) voltage, which is useful for powering devices.
Voltage Relationships in a Wye System:
In a Wye-connected generator, there is a specific relationship between the line-to-line voltage and phase-to-neutral voltage:
-
Phase-to-Neutral Voltage (VPH) is the voltage between any one of the phase conductors and the neutral point.
-
Line-to-Line Voltage (VLL) is the voltage between any two of the three-phase conductors.
The relationship between line-to-line voltage and phase-to-neutral voltage in a Wye system is given by the equation:
For example, if the phase-to-neutral voltage is 240V(RMS), the line-to-line (RMS) voltage will be:
Thus, for a Wye generator with a phase-to-neutral voltage of 240V(RMS), the line-to-line voltage will be 415V(RMS).
Wye Transformer Configuration:
In a Wye-Wye transformer configuration, both the primary and secondary sides of the transformer are wired in a Wye arrangement. This setup maintains the same phase-to-neutral and line-to-line voltage relationships as the Wye generator.
-
Primary Side: The transformer’s primary side receives the three-phase power from the generator, which is typically in a Wye configuration.
-
Secondary Side: The transformer’s secondary side can also be configured in a Wye arrangement, as shown in illustration #7, providing both line-to-neutral and line-to-line voltages for different applications.
When a Wye transformer is used, it is capable of providing both higher line-to-line voltages (for large industrial machines or equipment) and lower phase-to-neutral voltages (for residential and commercial systems).
Applications of Wye-Wye Systems:
Wye-connected generators and transformers are widely used in various applications where both line-to-line and line-to-neutral voltages are required:
-
Residential Power Systems: Wye systems provide 120V between each phase and neutral for standard household appliances (like lights, TVs, and computers), and 240V between phases for larger appliances (like dryers, ovens, etc.).
-
Industrial Applications: Wye systems are also used in 208V or 480V systems to power large machines and industrial equipment.
-
Balanced Load Distribution: Wye configurations help evenly distribute power across all three phases, ensuring the system operates efficiently.
Advantages of Wye-Wye Systems:
-
Grounding and Safety:
-
The neutral point in a Wye system can be grounded, offering a safe path for fault currents and protecting the system from voltage imbalances.
-
-
Versatility in Voltage Outputs:
-
Wye systems provide both line-to-neutral and line-to-line voltages, offering flexibility for residential (120V) and industrial (240V or higher) loads.
-
-
Efficient Power Transmission:
-
Wye systems are ideal for distributing power over long distances. The lower phase-to-neutral voltage reduces voltage drop and power loss, improving overall efficiency.
-
-
Simpler Grounding Mechanism:
-
The neutral point is easily accessible for grounding, which simplifies fault protection and ensures safety in the system.
-
-
Balanced Load Distribution:
-
The neutral point allows for better load balancing across the three phases, reducing the risk of overloading any individual phase.
-
Disadvantages of Wye-Wye Systems:
-
Ground Fault Issues:
-
If the neutral wire is disconnected or broken, the system can experience voltage imbalances, leading to potential damage to equipment and posing safety risks.
-
-
Requires a Neutral Wire:
-
A neutral wire is necessary for delivering line-to-neutral voltages, which adds complexity to the wiring compared to Delta systems that don't require a neutral.
-
-
Less Suitable for High-Power Motors:
-
Wye systems are generally less suited for driving large motors or high-power industrial machinery. Delta systems are preferred in these situations because they provide higher continuous power for demanding equipment.
-


Transformer Basics

A transformer is a critical component in electrical power distribution, used to step up or step down voltage levels between different parts of a system. Transformers operate on the principle of electromagnetic induction, which allows it to transfer electrical energy from one circuit to another without a direct connection. Transformers consist of two main parts: the primary winding (input) and the secondary winding (output), both wound around a core made of ferromagnetic material.
The voltage ratio between the primary and secondary windings is determined by the turns ratio, which refers to the number of coils in the primary winding compared to the number of coils in the secondary winding.
Transformer Voltage Ratios:
The voltage ratio of a transformer is given by the following formula:
Vprimary / Vsecondary = Nprimary / Nsecondary
-
Vprimary is the voltage applied to the primary winding.
-
Vsecondary is the voltage induced in the secondary winding.
-
Nprimary is the number of turns in the primary winding.
-
Nsecondary is the number of turns in the secondary winding.
For example, in a step-up transformer, the number of turns on the secondary winding is greater than the number of turns on the primary winding, which results in an increase in voltage (higher voltage on the secondary side). Conversely, in a step-down transformer, the secondary winding has fewer turns than the primary, which reduces the voltage on the secondary side.
Step-Up and Step-Down Transformers:
-
Step-Up Transformer: This type of transformer increases the voltage from the primary side to the secondary side. For example, if the primary side has a voltage of 240V and the transformer has a turns ratio of 1:2, the secondary voltage will be 480V.
-
Step-Down Transformer: A step-down transformer reduces the voltage. For example, if the primary side has a voltage of 480V and the turns ratio is 2:1, the secondary voltage will be 240V.
Current Ratios:
In addition to voltage, the current on the primary and secondary sides is also related by the turns ratio. Since the power (in watts) transferred from the primary to the secondary side must remain constant (assuming ideal conditions), the relationship between the current on the primary and secondary sides is the inverse of the voltage ratio:
Iprimary / ISecondary = Nsecondary / Nprimary
Where:
-
Iprimary is the current on the primary side.
-
Isecondary is the current on the secondary side.
So, if a step-up transformer increases the voltage, the current decreases in proportion, and if a step-down transformer reduces the voltage, the current increases.
Practical Example:
If a transformer has a primary voltage of 240V, a secondary voltage of 480V, and the turns ratio is 1:2, the transformer steps up the voltage. Assuming the primary current is 10A, the secondary current would be:
Isecondary = Iprimary / turns ratio = 10A / 2 = 5A
This means that the transformer increases the voltage while decreasing the current in proportion.
Overcurrent Protection in Electrical Systems:
Fuses and Circuit Breakers

Introduction to Fuses and Circuit Breakers in Electrical Systems:
In electrical systems, fuses and circuit breakers serve as essential protection devices that prevent damage to wiring, equipment, and systems in the event of an overcurrent. Both fuses and circuit breakers are designed to interrupt the flow of electricity when the current exceeds safe levels, but they differ in their operational mechanisms and applications.
In many electrical systems, fuses are still commonly used for overcurrent protection, especially in specialized systems due to their simplicity, reliability, and cost-effectiveness, although circuit breakers have become far more popular due to their resettable nature and convenience.
Both fuses and circuit breakers play a crucial role in protecting electrical systems from damage caused by overcurrent situations. The choice between the two depends on the specific requirements of the system, such as cost, maintenance, and resetting capabilities.
Fuses offer simple, effective, and cost-efficient protection, while circuit breakers are preferred in applications where resettable protection is necessary. Understanding how to size and select the right fuse or breaker for your system, along with the proper switching devices, is essential to maintaining the safety and efficiency of your electrical infrastructure.
How Fuses Work for Overcurrent Protection:
A fuse is a safety device that protects circuits by breaking the connection when the current exceeds a predefined threshold. Fuses are designed with a metal element that melts when the current passing through it exceeds the fuse’s rating. Once the fuse blows, the circuit is open, and the electrical flow is interrupted, preventing further damage to the equipment or wiring.
Fuses are typically used in a wide variety of applications, such as residential and commercial electrical systems, and they must be replaced once they blow. The fuse size is chosen to ensure that it can handle short bursts of high current (such as during equipment startup) while still protecting the equipment in the event of a sustained overload.
Fuse Sizing:
The size of the fuse must be carefully selected to protect the equipment without tripping too early during normal operations. In general, fuse size is based on the expected current that will flow through the circuit under normal operating conditions, with a safety factor added to handle temporary surges.
Example: Fuse Sizing for a Transformer:
1. Primary Side (240V):
10A × 1.25 = 12.5A
-
If the current on the primary side of the transformer is 10A, the fuse should be rated at 125% of that current to accommodate short current spikes like those that may occur during startup.
-
The fuse rating would be: The next standard fuse size would be 15A, which would be appropriate for protecting the primary side of the transformer (240V).
2. Secondary Side (480V):
5A × 1.25 = 6.25A
The next standard fuse size would be 7A or 10A, depending on the specific equipment and system requirements.
-
On the secondary side of the transformer, where the current is 5A (due to the step-up voltage), the fuse rating should also be 125% of the current.
Types of Fuses:
-
Class T Fuses:
-
These are typically used when fast-acting protection is needed, such as in sensitive circuits that require quick response to overcurrent's, such as transformers and motors.
-
-
Class H Fuses:
-
Class H fuses are general-purpose fuses designed for standard applications. These fuses are commonly used in residential and commercial electrical systems for reliable protection from short circuits and overloads.
-
-
Class L Fuses:
-
These fuses are used for high-power applications and typically provide time-delay protection, meaning they allow for temporary overcurrent situations (such as startup surges) without immediately blowing.
-
Fuse vs. Circuit Breaker:
Fuses are simple, one-time-use devices that disconnect the circuit when an overcurrent condition is detected. After a fuse blows, it must be replaced. Circuit breakers, on the other hand, are resettable devices that trip and open the circuit when overcurrent occurs but can be manually reset after the issue is addressed. Both fuses and circuit breakers are effective at protecting electrical systems, but there are key differences:
-
Fuses are often more cost-effective, compact, for a wide variety of applications.
-
Circuit Breakers are more commonly used in industrial and commercial settings where resetability is important.
Switching Devices:
In addition to fuses, various switching devices are used in electrical systems to disconnect the load or isolate portions of the system for maintenance or safety. These switches help prevent overcurrent situations and allow for safe operation during repairs.
-
Disconnect Switches:
-
Disconnect switches are used to isolate sections of the electrical system when necessary, allowing for maintenance and preventing electrical accidents. These are typically used between a generator and a transformer.
-
-
Manual Transfer Switch (MTS):
-
An MTS is commonly used in systems with generators to switch between generator power and utility power. It ensures that only one power source is connected at a time to prevent backfeed or overload.
-
-
Load Break Switches:
-
These are used in industrial settings to safely disconnect electrical loads when necessary, ensuring a reliable and safe system shutdown.
-
Main Circuit Breaker Panel Basics
- Residential Service
Illustration #8

In residential electrical systems in North America, split-phase is the more accurate term for the 120V/240V service commonly used in homes.
A split-phase system has two hot wires (L1 and L2), each carrying 120V relative to neutral. The two hot wires are 180 degrees out of phase with each other, which means when you combine them, you get 240V between the two hot wires.
In this system, you can have 120V between one hot wire and neutral for standard appliances, and 240V between the two hot wires for larger appliances (like dryers or ranges).
Main Circuit Breaker Panel Overview:
(Illustration #8)
The main circuit breaker panel (also called a service panel or breaker box) is where the electrical service enters the house and is distributed to various circuits for lighting, appliances, and outlets. It contains the main circuit breaker and several branch circuit breakers.
The panel is designed to safely manage the electrical distribution system for a home, protecting circuits and devices from overloads, shorts, and faults.
Split-Phase System (Common in Residential 120V/240V Service):
-
In residential electrical systems in North America, split-phase is the more accurate term for the 120V/240V service commonly used in homes.
-
A split-phase system has two hot wires (L1 and L2), each carrying 120V relative to neutral. The two hot wires are 180 degrees out of phase with each other, which means when you combine them, you get 240V between the two hot wires.
-
In this system, you can have 120V between one hot wire and neutral for standard appliances, and 240V between the two hot wires for larger appliances (like dryers or ranges).
Common Total Ratings of the Box/Ampacity Rating of the Panel:
-
The total ampacity of a residential main breaker panel is typically rated at either 100 amps, 150 amps, or 200 amps in most homes.
-
100-Amp Panel: Common in older homes or small residences with minimal electrical load.
-
150-Amp Panel: Often found in homes with moderate electrical demands.
-
200-Amp Panel: Standard for most modern homes, especially those with larger electrical demands (e.g., electric heating, electric car chargers, large appliances, etc.).
-
Main Circuit Breaker Rating:
-
The main circuit breaker (located at the top of the panel) has a rating that matches the overall panel capacity. It is designed to protect the entire electrical system in the house by cutting power if there is a short circuit or overload.
-
100-Amp Main Breaker: Protects up to 100 amps of total service.
-
150-Amp Main Breaker: Protects up to 150 amps of total service.
-
200-Amp Main Breaker: Protects up to 200 amps of total service.
-
Important Note: The main breaker is a safety device that disconnects all power to the panel when it trips. This is often the primary way to shut off power to the entire home in an emergency.
Common Types of Breakers in the Panel:
The panel will have a mix of 120V and 240V breakers that control the individual circuits. Here’s how they are generally divided:
120V Circuit Breakers:
-
These circuit breakers control standard 120V circuits (most household outlets and lighting).
-
Common breaker sizes for 120V circuits are 15A and 20A, though larger sizes (like 30A) may be used for specific appliances (e.g., small air conditioning units).
-
15A Breaker: Typically used for lighting, outlets, and small appliances.
-
20A Breaker: Common for kitchen outlets and heavier-duty appliances.
-
240V Circuit Breakers:
-
These circuit breakers control 240V circuits, which are necessary for larger appliances that require more power, such as electric dryers, ranges, water heaters, and air conditioners.
-
A 240V circuit uses two hot wires (typically black and red), which makes it double the voltage of the standard 120V system. These circuit breakers are typically double-pole breakers, which cover both hot wires.
-
30A-60A Double-Pole Breaker: Common for dryers or small ovens.
-
50A-60A Double-Pole Breaker: Common for ranges and large ovens.
-
80A-100A Double-Pole Breaker: For electric heating systems or large appliances.
-
Important Features and Considerations for the Main Panel:
1. Panel Size and Breaker Slots:
-
Most residential panels come with 20 to 42 breaker slots, though the number of available slots depends on the model. The size of the panel and its total amp rating determines how many individual circuits you can install.
-
Panels are designed with spacer slots for future expansion, so homeowners can add more breakers if additional circuits are needed in the future.
2. Breaker Configuration:
-
Single-Pole Breakers: Used for 120V circuits. These breakers connect to a single hot bus bar.
-
Double-Pole Breakers: Used for 240V circuits. These breakers connect to two bus bars, each carrying one phase of the 240V service.
3. Subpanels:
-
Some homes may have additional subpanels (or distribution panels) that are connected to the main panel, often used for specific areas (e.g., a workshop, garage, or outdoor pool). Subpanels have their own breakers and receive power from the main panel, but they do not have a main breaker.
4. Grounding and Bonding:
-
The panel should have a neutral bar and ground bar for proper grounding of the electrical system.
-
Neutral bar: Connects the neutral wire from the service to the panel’s neutral bus bar.
-
Ground bar: Connects the ground wire from the service and all ground wires from branch circuits.
-
-
Bonding ensures that the panel is safely connected to the ground, which prevents electrical shock hazards. The grounding electrode system (such as a ground rod or water pipe) should be connected to the panel’s ground bar.
5. Circuit Labeling:
-
Proper labeling of each circuit is critical for safety and future troubleshooting. Circuit breakers should be clearly labeled with their corresponding function or device, e.g., “Kitchen Outlets,” “Master Bedroom,” “Dryer,” etc.
6. Common Code Compliance and Safety Features:
-
NEC Compliance: The panel should comply with the National Electrical Code (NEC), which sets the standards for electrical wiring and safety. A licensed electrician will ensure that the panel installation meets local and national codes.
-
Arc Fault Circuit Interrupters (AFCIs): These breakers detect electrical arcs and can prevent fires. They are required by the NEC for certain areas, like bedrooms, living rooms, and other habitable spaces.
-
Ground Fault Circuit Interrupters (GFCIs): These breakers are used to protect against electric shock hazards, especially in wet areas like kitchens, bathrooms, and outdoor outlets.
-
Surge Protection: Some residential panels come with built-in surge protection devices (SPDs) to protect the entire electrical system from power surges (e.g., lightning strikes).
Earth Grounding

In most electrical systems, neutral and ground are connected together at the main circuit breaker panel, where the electrical power lines enter your building from the utility provider.
Neutral and Ground Bonding:
At the main electrical panel (also called the service panel) in your home or business, neutral and ground are connected together in what’s called the bonding point (See Illustration # 8). This is the only point where neutral and ground should be connected in a properly wired system.
-
The neutral wire carries return current back to the utility provider from appliances and devices in your home.
-
The ground wire provides a safe path for electrical faults to dissipate into the earth, helping prevent electrical shocks and fires.
Why is Neutral and Ground Bonded?
-
The purpose of bonding neutral and ground at the service panel is to ensure that the neutral conductor is at the same electrical potential as the ground. This is necessary for safety because it ensures that in the event of a fault (e.g., a short circuit), the grounding system can carry any stray current safely into the earth.
-
It also provides a return path for current to flow back to the utility.
Upstream of the Service Panel (at the Utility Provider):
-
At the utility’s transformer or service entrance, the neutral wire is typically grounded. The utility's neutral is tied to a grounding electrode (like a rod or plate) to stabilize the system.
-
Neutral and ground are not bonded together upstream of your service entrance, but they are connected at the point of service, where your electrical system connects to the utility.
Important Safety Rule:
Do not connect neutral and ground together anywhere except at the main service panel. If you were to connect neutral and ground together in other places, it can cause unintended paths for current, potentially creating a shock hazard and interfering with the proper functioning of circuit breakers and electrical devices.
Proper Method to Check if the Ground Wire is Properly Grounded:
1. Earth Ground Resistance Test (Using a Clamp Meter or Ground Resistance Tester):
The most accurate way to check if a ground wire is properly grounded is by measuring the resistance to earth. This can be done with a ground resistance tester (also known as an earth ground tester).
-
Ground Resistance Tester: This device is designed to measure the resistance between the ground wire and the earth itself. A typical reading for a properly grounded system should be less than 25 ohms, as recommended by many electrical codes (like the National Electrical Code (NEC)). If the resistance is higher than this, the grounding system may not be effective.
2. Testing Using Neutral as a Reference:
You can also perform a voltage drop test between the ground wire and the neutral wire in the system.
-
Procedure:
-
Set up a multimeter to measure voltage.
-
Measure the voltage between the ground wire and neutral wire at a power outlet or at the panel.
-
No voltage or a very small voltage (usually close to 0V) should be present between the neutral and the ground wire if the ground is properly bonded to the earth.
-
A significant voltage difference between ground and neutral would indicate a problem with the grounding system or a poor ground connection.
-
3. Using an Ohmmeter to Measure Resistance:
Another method, although less common in large-scale installations, is using an ohmmeter to measure resistance between the ground wire and a known good earth ground (e.g., ground rod or grounding system).
-
Procedure:
-
Disconnect the ground wire from the electrical system (ensure safety by turning off power).
-
Place one probe of the ohmmeter on the ground wire and the other probe in the earth or on a grounding rod.
-
A very low resistance (close to zero) should be observed, indicating a good earth connection.
-
High resistance indicates that the ground wire is not properly connected to the earth, requiring inspection or repair.
-
4. Visual Inspection for Proper Bonding:
-
While resistance testing is the primary method for determining grounding effectiveness, you should also visually inspect that the ground wire is properly bonded to the neutral bar in the service panel and connected to a reliable earth grounding system (e.g., a grounding rod driven into the earth).
-
Check for corrosion or loose connections that could interfere with proper grounding.
Important Notes:
-
The NEC requires that ground resistance be 25 ohms or less for residential systems to be considered safe.
-
For commercial or industrial systems, it may be required to achieve even lower resistance values (e.g., less than 5 ohms in some cases).
-
Ensure the use of proper testing equipment and methods to avoid inaccurate results and maintain safety.
In summary, the most effective and reliable way to determine if a ground wire is truly grounded to the earth is to perform a ground resistance test with an earth ground tester or similar equipment. If you are unsure or don't have the proper tools, it’s always a good idea to consult with a licensed electrician to ensure the grounding system is safe and functional.
Ground Fault Interrupter's (GFI)

Ground Fault Circuit Interrupters (GFCIs) are essential safety devices used to protect people from electrical shock. They are designed to quickly detect and stop a ground fault by interrupting the electrical circuit when a difference between the hot (live) wire and the neutral wire is detected, preventing the risk of electric shock.
Here’s everything you need to know about Ground Fault Circuit Interrupters (GFCIs):
1. What is a GFCI?
A Ground Fault Circuit Interrupter (GFCI) is an electrical safety device that protects people from electrical shock hazards by detecting differences between the hot (live) and neutral conductors in an electrical circuit. It works by shutting off power to the circuit if it detects any imbalance in current flow, typically caused by current leakage to the ground (a "ground fault").
2. How Does a GFCI Work?
A GFCI monitors the flow of current through the hot and neutral wires. Under normal operation, the current flowing through both wires is equal and balanced. If a difference occurs — even as small as 5 milliamps — it indicates that current is flowing somewhere it shouldn’t, like through a person (e.g., if someone is shocked by touching a live part of an appliance or outlet).
-
If the GFCI detects an imbalance between the incoming and outgoing current (usually due to leakage), it trips (or interrupts the circuit), cutting off the power in less than 1/40th of a second.
-
GFCIs work even if there’s no grounding connection in the circuit. They don’t need a grounding conductor to function properly.
3. Where are GFCIs Used?
GFCIs are required in areas where electrical equipment may come into contact with water or moisture. These locations present a higher risk of ground faults, so installing a GFCI is essential for safety.
Common areas where GFCIs are required include:
-
Kitchens: Especially near sinks or wet areas.
-
Bathrooms: Near sinks, bathtubs, or showers.
-
Garages: Where electrical outlets may be used with power tools or appliances in wet conditions.
-
Outdoor Areas: For outlets that may be exposed to rain or moisture.
-
Basements: Especially in areas where water may accumulate.
-
Laundry Rooms: Near washers or dryers.
-
Spa or Pool Areas: Where electrical outlets are used near water.
4. Types of GFCIs:
There are three main types of GFCIs that are commonly used in electrical systems:
-
Receptacle (Outlet) GFCI:
-
This is the most common type and is installed as a replacement for a standard outlet.
-
It has two outlets, one that’s protected and one that’s not (in some models).
-
Ideal for areas like bathrooms, kitchens, or garages where you need protection for plugging in appliances.
-
-
Circuit Breaker GFCI:
-
This type of GFCI is installed directly in the electrical panel and protects the entire circuit.
-
It is more suitable for whole circuits, such as a kitchen or a bathroom, and provides GFCI protection for multiple outlets or devices on that circuit.
-
If the breaker detects a ground fault, it will trip and stop the flow of electricity throughout the entire circuit.
-
-
Portable GFCI:
-
This is a portable device that you plug into an outlet and then plug your appliance or tool into the portable GFCI.
-
It’s used in situations where you need temporary protection, such as with power tools, outdoor equipment, or appliances when a GFCI outlet is not available.
-
5. GFCI Testing & Resetting:
To ensure your GFCI is working properly, you should test and reset it regularly.
Testing a GFCI:
-
Most GFCIs have a test button and a reset button. Press the test button, and the GFCI should trip, cutting off power to the outlet.
-
After testing, press the reset button to restore power.
Resetting a GFCI:
-
After the GFCI has tripped, the reset button needs to be pressed to restore the circuit. If the button doesn’t pop out when the GFCI is tripped, it may indicate a fault or problem with the outlet or circuit.
6. GFCI vs. AFCI (Arc Fault Circuit Interrupter):
-
GFCIs protect against ground faults — situations where current is leaking to the ground, like when a person is shocked by faulty wiring.
-
AFCIs (Arc Fault Circuit Interrupters) protect against arc faults, which occur when electricity jumps between wires (like a spark or arc) due to damaged or frayed wires. AFCIs are designed to prevent electrical fires caused by arcs.
-
AFCIs and GFCIs can work together to provide comprehensive protection. GFCIs prevent shocks, while AFCIs prevent fires.
7. Why GFCIs Are Important for Safety:
-
Protection from Electric Shock: The primary function of a GFCI is to protect people from electrical shock hazards, especially in wet or damp locations where the likelihood of ground faults is higher.
-
Prevention of Electrical Fires: By detecting faults and imbalances in current flow, GFCIs can prevent situations that might otherwise lead to dangerous fires.
-
Safety Standards: The National Electrical Code (NEC) requires GFCIs to be installed in specific locations to ensure safety in residential, commercial, and industrial buildings.
8. Common Issues with GFCIs:
-
GFCI Trips Frequently:
-
GFCIs may trip frequently due to overload, moisture, or faulty wiring.
-
A ground fault in the circuit, such as a tool with a short or faulty appliance, can cause the GFCI to trip.
-
-
GFCI Won't Reset:
-
If the reset button won’t stay in, it could be because the circuit is still faulty (e.g., an ongoing ground fault). A professional electrician should inspect the system.
-
-
GFCI Won’t Test:
-
If the test button doesn’t trip the GFCI, it could be defective. Replacing the GFCI outlet is necessary for proper function.
-
9. Installation of GFCIs:
-
Receptacle GFCIs are installed in place of a standard electrical outlet, with the hot, neutral, and ground wires connected to the respective terminals.
-
GFCI Circuit Breakers are installed directly in the electrical panel in place of standard circuit breakers. These breakers protect the entire circuit, including multiple outlets.
Important Installation Tip:
-
GFCIs must be wired correctly to work properly. If there’s a mistake in the wiring (like swapping the neutral and hot wires), the GFCI may not function correctly.
10. Maintenance & Lifespan of GFCIs:
-
Lifespan: GFCIs have a limited lifespan. Typically, they last around 10 years before they may begin to fail.
-
Regular Testing: To ensure they’re working, test the GFCI outlet once a month and inspect for any visible signs of damage.
Electrical Wiring Basics
When selecting the appropriate wiring for residential and commercial electrical systems, understanding wire gauges, insulation types, ampacity, and conductor material is crucial. The choice between solid and stranded wire is an important consideration, often based on the application, the wire's need for flexibility, and the overall cost-effectiveness.
Solid vs. Stranded Wire: Why Solid is Preferred in Residential and Commercial Wiring
Solid Wire:
Solid wire consists of a single, continuous strand of conductor material, typically copper or aluminum. It is most commonly used in residential and commercial wiring applications because:
-
Fixed Installation: In both residential and commercial buildings, once the wire is installed and routed, it typically remains stationary throughout its life. There is minimal to no movement, so solid wire is ideal. Its rigid structure ensures that it stays in place, reducing the likelihood of damage over time.
-
Lower Cost: Solid wire is generally cheaper to manufacture than stranded wire because it involves fewer steps and materials. It also requires less labor and manufacturing time, which contributes to its affordability.
-
Durability and Efficiency: Solid wire is more robust for permanent installations because it has a lower resistance at the same gauge, providing better conductivity. It is ideal for stationary wiring in walls, ceilings, and conduits where flexibility isn't needed.
Stranded Wire:
Stranded wire consists of multiple thin strands of wire twisted together to form the conductor. This type of wire is more commonly used where flexibility is required, such as in movable applications like power cords, extension cords, or in equipment that might require regular movement (e.g., motors, or connections that need to bend and flex). While stranded wire has certain advantages, it's generally more expensive than solid wire because:
-
Manufacturing Complexity: Stranded wire is more complex to manufacture because it involves multiple individual strands of wire that need to be twisted together, which requires more time, labor, and materials.
-
Cost: Due to the manufacturing process and the additional material needed, stranded wire is more expensive than solid wire.
-
Flexibility: The key advantage of stranded wire is its flexibility. It’s ideal for applications where the wire needs to move or bend frequently without breaking or fraying. For example, connections in portable equipment or cords used in machinery are often made with stranded wire.
How Ampacity is Calculated for Wire
The ampacity (the maximum current a wire can safely carry) is calculated based on several factors, including the wire gauge, conductor material, insulation type, ambient temperature, and installation conditions.
-
Wire Gauge and Diameter: The thicker the wire (lower the gauge number), the more current it can carry. Solid wire typically carries current more efficiently due to its fewer contact points.
-
Conductor Material: Copper is more conductive than aluminum, meaning copper wire of the same size can carry more current.
-
Insulation Type: Different insulation types (e.g., THHN, Romex, XHHW) allow for different voltage ratings and heat tolerance, which impacts the ampacity.
-
Installation Conditions: Wires installed in conduits or walls may have reduced ampacity due to limited heat dissipation, while wires exposed to air may have higher ampacity.
-
Temperature: Higher temperatures can reduce the ampacity of wires, so wires must be selected based on the expected temperature range of the environment.

Insulation Types and Voltage Ratings
Different types of insulation allow wires to operate at varying temperature limits and voltage levels. Common insulation types include:
-
THHN: Rated for 600V and heat-resistant up to 90°C in dry environments, commonly used in both residential and commercial wiring.
-
THWN: Similar to THHN, but with added water-resistance, making it suitable for wet locations.
-
XHHW: Used for both wet and dry locations and rated for 600V, commonly used for outdoor or industrial installations.
-
Romex (NM-B): Non-metallic sheathed cable, rated for 600V, ideal for general-purpose residential wiring.
-
MC Cable: Metal-clad cable, often used in commercial applications for greater protection against physical damage.
Color Codes for Electrical Wiring
The color codes for electrical wiring are standardized to help ensure safety and clarity when identifying the function of each wire in a system. The National Electrical Code (NEC) sets guidelines for these color codes, though there can be some slight variations depending on local codes or specific applications. Below is a comprehensive guide to color coding for residential and industrial wiring systems across various voltages and configurations:
Residential Wiring (120V and 240V)
For typical residential circuits, such as lighting and outlets, 120V systems are single-phase and have three wires: hot, neutral, and ground.
-
Hot (Live) Wire: Black (or sometimes Red for second hot in 240V circuits)
-
Neutral Wire: White
-
Electrical System Ground: Green, or Bare Copper
-
System Earth Ground: Green with yellow, or white stripes.
240V Split-Phase Wiring (Residential Appliances like Dryers, Ranges)
240V split-phase systems in residential wiring typically use two hot wires, a neutral wire, and a ground wire. This system is commonly used for appliances that require 240V (e.g., dryers, ranges, water heaters).
-
Hot (Live) Wires: Black and Red
-
Neutral Wire: White
-
Electrical System Ground: Green, or Bare Copper
-
System Earth Ground: Green with yellow, or white stripes.
Industrial Wiring (208V and 480V)
208V Three-Phase Wiring (Common in Commercial/Industrial)
208V three-phase systems are commonly found in commercial or industrial applications. These systems use three-phase power, typically providing more efficient power transmission for machinery and heavy equipment.
-
Phase 1 (Hot) Wire: Black
-
Phase 2 (Hot) Wire: Red
-
Phase 3 (Hot) Wire: Blue
-
Electrical System Ground: Green, or Bare Copper
-
System Earth Ground: Green with yellow, or white stripes.
480V Three-Phase Wiring (High Voltage Industrial)
In industrial settings where high voltage (480V) three-phase systems are used, such as in large machinery or commercial equipment, the color code remains consistent with 208V three-phase systems but for higher voltage.
-
Phase 1 (Hot) Wire: A - Black
-
Phase 2 (Hot) Wire: B - Red
-
Phase 3 (Hot) Wire: C - Blue
-
Neutral Wire: White, Grey
-
Electrical System Ground: Green, or Bare Copper
-
System Earth Ground: Green with yellow, or white stripes.

Additional Notes on Color Coding:
-
Phase 1, Phase 2, Phase 3 (Hot Wires): These are color-coded to make identification easier, and the colors follow a specific order in most cases, particularly in three-phase systems.
-
Neutral Wire: Always white, except in some specialized or older systems.
-
Ground Wire: It is always either green, green with yellow stripes, or bare copper. A bare copper wire also represents the ground wire.
-
PG (Protective Ground) and PE (Protective Earth) are terms referring to the grounding system that provides safety by ensuring exposed metal parts of electrical systems are safely connected to the earth, thus preventing electric shock hazards.
-
PE is more widely recognized in modern electrical standards (especially in Europe) and typically refers to the protective earth wire, usually green/yellow.
Special Considerations for 277V (Common in Commercial)
In some commercial or industrial systems, 277V single-phase wiring may be used, typically derived from a 480V three-phase system. For 277V wiring, the color codes for hot, neutral, and ground are the same as for 480V, but it's used for lighting circuits primarily.
-
Hot (Live) Wire: Black (or Violet in some cases)
-
Neutral Wire: White
-
Ground Wire: Green or Bare
Important Safety Reminders:
-
Color Codes May Vary by Region: While the NEC provides these standard color codes, always check local or regional codes to confirm compliance with local requirements.
-
Consistency: Always follow the standard color codes to ensure safety and to prevent confusion. Proper identification of wiring prevents errors during installation, troubleshooting, and maintenance.
-
Never Use Similar Colors for Different Purposes: For example, avoid using black for neutral or ground, as this could lead to dangerous situations.
By adhering to these color-coding guidelines, you can ensure that the electrical systems are safe, compliant with the NEC, and easy to troubleshoot.
Choosing the Right Wire Gauge for Circuits
The appropriate wire gauge is determined by:
-
The total current (amps) required by the load (e.g., appliances, lights).
-
The length of the wire run. Longer distances require a larger gauge to minimize voltage drop.
-
The wire's insulation type, as different insulation types can impact current-carrying capacity.
-
The installation method, whether in a conduit or exposed to air, as this can influence the wire's ampacity.
Residential vs. Commercial Wiring: Considerations
-
Residential Wiring: In homes, solid wire is typically used for most permanent wiring applications, such as in walls, ceilings, and conduits. The most common wire is Romex (NM-B) cable, which is used for lighting and power circuits. 12 AWG is typical for lighting, while 10 AWG is used for heavy-duty appliances like dryers and water heaters.
-
Commercial Wiring: In commercial settings, flexible wiring (often stranded) may be used for equipment that requires movement, while solid wire is still the most common for fixed, permanent installations. Larger gauge wires (e.g., 8 AWG or 6 AWG) are often used to handle higher currents in industrial equipment or large appliances.
Safety and Code Compliance
Electrical systems should always follow the National Electrical Code (NEC) to ensure safety and code compliance. Some key safety devices to use include:
-
Ground Fault Circuit Interrupters (GFCIs) for wet areas like kitchens and bathrooms.
-
Arc Fault Circuit Interrupters (AFCIs) for preventing electrical fires, often required in bedrooms.
-
Fuses and Circuit Breakers: Protect the circuit from overloads and short circuits. Each wire must be paired with the appropriate fuse or breaker size based on its ampacity.
Types of Voltage Measuring Devices / Meters

RECOMMENDED FOR BASIC ELECTRICAL WORK
1. Digital Multimeters (DMM):
-
Purpose: Measures voltage, current, resistance, and more.
-
Measurement Type: Most DMMs measure RMS voltage (Root Mean Square), useful for AC and DC circuits.
-
Advantages: Easy to use, precise digital display, and versatile for a wide range of measurements.
-
True RMS Models: For accurate measurement of non-sinusoidal AC waveforms.
2. Analog Voltmeters:
-
Purpose: Older type of voltmeter with a needle that moves across a scale.
-
Measurement Type: Typically measures RMS voltage in AC circuits but can also be used for DC.
-
Advantages: Simple, provides a continuous reading of voltage.
-
Limitations: Less accurate than digital models, especially with complex waveforms.
3. True RMS Voltmeters:
-
Purpose: Measures the true RMS value of any waveform (sinusoidal or non-sinusoidal).
-
Advantages: Accurate measurement for complex AC signals, including distorted or irregular waveforms.
-
Use Case: Ideal for power electronics and situations with non-sinusoidal waveforms like square or triangular waves.
4. Peak and Peak-to-Peak Voltmeters:
-
Purpose: Measures the highest (peak) or the full range (peak-to-peak) of a waveform.
-
Advantages: Useful for analyzing the extremes of AC signals.
-
Use Case: Often used in signal analysis for oscilloscopes or for measuring audio and RF signals.
LEGAL DISCLAIMER
Legal Disclaimer
The information, diagrams, and circuits provided on this website are hypothetical and theoretical in nature and are intended solely for educational and learning purposes. These materials are designed to assist with understanding the operation of AC generators and various electrical systems, with knowledge that is relevant to real-world applications. However, this content is not intended to serve as a comprehensive guide for performing actual electrical installations or repairs.
Important Safety Notice:
-
Always refer to the National Electrical Code (NEC) and any applicable local electrical codes when working with electrical systems or devices.
-
Never attempt to work with electrical circuits, devices, or systems unless you are properly trained and qualified to do so. Electrical work can be dangerous and may result in injury, death, or property damage if not performed correctly.
By using this website and its contents, you acknowledge that you are solely responsible for ensuring your compliance with all relevant codes and safety standards. I am not liable for any errors, omissions, or inaccuracies in the information presented, nor for any direct, indirect, incidental, or consequential damages arising from your use of this website.
Disclaimer of Liability: The owner of this website, its creators, and contributors shall not be held liable for any damages or losses incurred as a result of using the information contained herein. Always seek professional advice from a licensed electrician before engaging in any work on electrical systems.